GOLF CLUB
HOLE BY HOLE
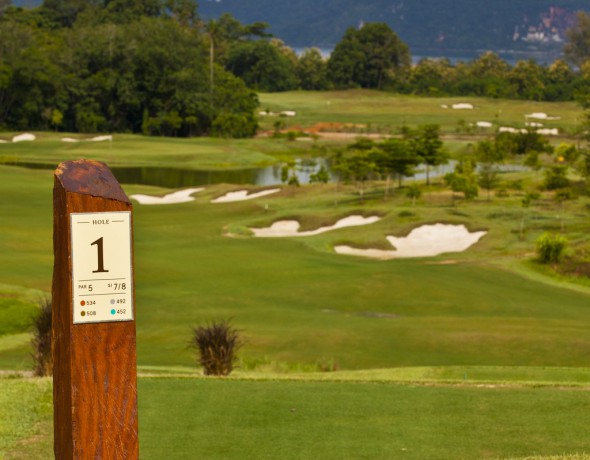
HOLE 1 . PAR 5 . 490 M
The round starts with a tempting par 5 from elevated tees. Whilst the tee shot here is confronted by several bunkers on the right and water to the left, the landing zone is deceptively wide, enticing long hitters to open their shoulders.
The heroic golfer will need to skirt the bunkers on the right to shorten the hole slightly and present an opportunity to attack the green in two.
Whilst many will take the safer three shot route to the left, the eagle chance should unearth a few gamblers.
Before starting, take a moment to enjoy the panoramic view of the course and the ocean beyond.
HOLE 2 . PAR 3 . 165 M
An exciting and tempting par 3 over the water. Probably only a mid-iron for most, the brave will attack the pin across the water. Those not so daring will aim further left over land, but their caution will present them with a daunting bunker shot from the left side if the green is missed.
Even those landing on the green will want to be close to the pin as the undulating surface will test the best of putters.
HOLE 3 . PAR 4 . 385 M
An intriguing par 4 is next with pin locations influencing the line taken off the tee.
When the flag sits front left, the best line is from the right edge of the fairway. However, if the pin is over on the right section of the green, the optimum line should be from the left edge of the fairway.
The putting green is nestled amongst a rainforest setting surrounded by padi terraces to the left and rear.
HOLE 4 . PAR 4 . 365 M
The fourth is an uphill par 4 into the rainforest. The opening tee shot is into a generous sized fairway, although bunkers to the right should be carefully avoided. The approach shot is played gently uphill to a green requiring excellent distance judgement as the base of the pin will not be visible.
The tees on the 4th hole enjoy the panoramic views over the ocean towards Kuah town and the islands beyond.
HOLE 5 . PAR 4 . 380 M
This is a stronger par 4 hole, with another uphill fairway carved through the native rainforest. The best shaped tee shot is from left to right to avoid the fairway bunkers. Accurate iron play will be demanded of this large undulating putting surface. Watch out for the terraced paddies ahead as the fairway arcs to the green on the right.
HOLE 6 . PAR 5 . 565 M
The tee to this monster par 5 sits at the highest point of the course. The fairway descends ahead of you and the mountains in the distance scream out for a huge drive. Those connecting well will be rewarded with additional run as the second half of the hole descends further to the green, which is tucked in amongst the trees with beautiful vistas to the ocean beyond. Getting on in two will require two big strikes, the second requiring pinpoint accuracy to avoid the greenside bunkers and get the run onto the green.
HOLE 7 . PAR 4 . 405 M
This long par 4 from elevated tees requires a tee shot shaped from right to left to enable the shortest distance and best line of approach. The rainforest on the left of the hole must be avoided from the tee.
After a safely executed tee shot, a mid to short iron shot approach shot will be needed. A large undulating green awaits and putting will be difficult from long range.
HOLE 8 . PAR 4 . 395 M
This mid-length par 4 plays uphill to a plateau landing area. You will need to flirt with the bunkers on the right to be rewarded with the best line in.
The approach shot should be best tackled with a left to right shape thus avoiding the greenside sand.
HOLE 9 . PAR 3 . 210 M
The longer of the par 3’s on the layout features a putting green framed nicely by the distant islands. The target is guarded by sand both left and right and will demand a long and accurate tee shot. Many games will be won and lost on this final green alone.